There are a number of tools out there to help you provision and make changes to your AWS infrastructure. Each have their own strengths and weakness. One such tool which we use here at INAP is a product from HaishCorp called Terraform. Terraform is a powerful tool that lets you provision AWS services as Infrastructure-as-Code or IAC. There are many other tools that let you provision IAC such as Chef, Puppet, Ansible or Cloudformation, but I think Terraform offers several advantages.
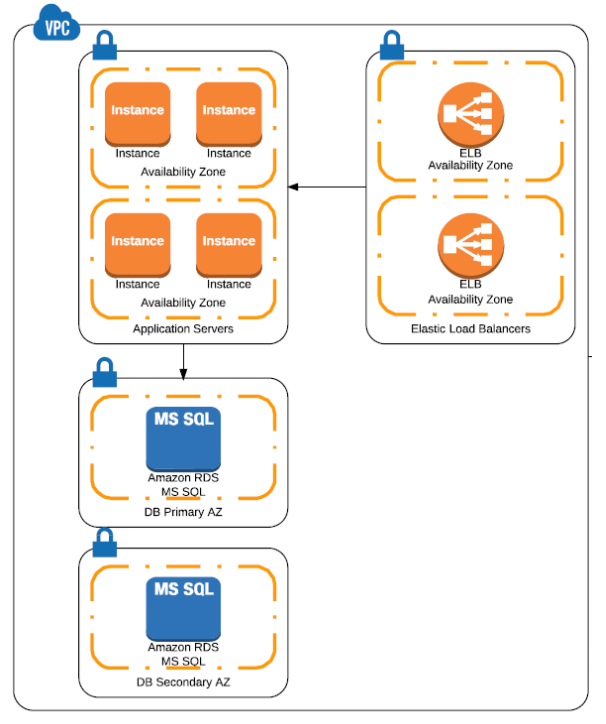
However, Terraform can, at first glance, be a daunting thing to understand. Although the documentation is fantastic, there are many commands and many variables for those commands. In this article, I’ll introduce TerraForm by building a simple network configuration example in AWS. We will be designing for a basic web application that will have three layers – Load Balancers, Application Servers and RDS or database instances.
First, we will need to declare some variables prompted by the TerraForm application. These are simply the AWS Access key and Secret key. For information on obtaining these please see this guide from Amazon.
variable “access_key” {}
variable “secret_key” {}
variable “region” {
default = “us-east-1”
}
Next, we will create a basic VPC and use the following subnet 172.17.0.0/16.
resource “aws_vpc” “prod-main” {
cidr_block = “172.17.0.0/16”
tags {
Name = “prod-main”
}
}
Now we will need subnets inside of the VPC to use to host our application. Since we always want to design for maximum availability we need to ensure that no service rests on a single Availability Zone (AZ). To that end, we are going to create six subnets in total – two each for our Elastic Load Balancers, EC2 Instances, and our RDS instances.
resource “aws_subnet” “app-main” {
vpc_id = “${aws_vpc.prod-main.id}”
cidr_block = “172.17.10.0/24”
availability_zone = “us-east-1a”
tags {
Name = “app-main”
}
}
resource “aws_subnet” “app-secondary” {
vpc_id = “${aws_vpc.prod-main.id}”
cidr_block = “172.17.11.0/24”
availability_zone = “us-east-1d”
tags {
Name = “app-secondary”
}
}
Note that the above block of code creates the subnet for the application layer and uses the us-east-1a and 1d AZs so that we can place our EC2 instances in both those zones. We will repeat the above for the ELB and RDS layers.
Next, we will create an internet gateway and attach it to the VPC.
resource “aws_internet_gateway” “gw” {
vpc_id = “${aws_vpc.prod-main.id}”
tags {
Name = “maingateway”
}
}
The last thing we need to do is create some security groups, specifically a security group for our ELBs allowing access to port 80.
resource “aws_security_group” “elb-main-sg01” {
name = “elb-main-sg01”
description = “Used for the ELBs”
vpc_id = “${aws_vpc.prod-main.id}”
# HTTP access from anywhere
ingress {
from_port = 80
to_port = 80
protocol = “tcp”
cidr_blocks = [“0.0.0.0/0”]
}
# outbound internet access
egress {
from_port = 0
to_port = 0
protocol = “-1”
cidr_blocks = [“0.0.0.0/0”]
}
}
Once you complete this activity, you should be able to see just how powerful a tool Terraform is for creating IAC for deployment in AWS. Better yet, the application also allows you to make changes to the IAC and only deploy those changes to AWS as opposed to a complete teardown and rebuild.
You can download the full Terraform AWS Network Template [.zip] here. If you have any questions, reach me in the comments. Or if you’re looking for someone to design, optimize and manage your AWS environment, get in touch today.