
Amazon Redshift is a powerful and fully managed data warehouse solution from AWS. It makes it extremely easy and cost-effective to analyze your data using standard Business Intelligence tools. But before we get into what Redshift can do for you it is important to also say what it can’t, or rather, shouldn’t do for you. Redshift is not built to be an alternative to a standard database (MYSQL, Postgres, etc.) and is not particularly good at:
- On demand, real-time updates/deletes
- Answering tens of thousands of concurrent queries in milliseconds
- Searching specific values by a pre-defined index
- Other, non-OLAP use cases
The key point to remember here: Redshift was built for Business Intelligence so its concurrency is low and limited. Rather, it is wise to ingest data into the system in batches.
So in this post we are going to explore a simple example of getting your data into Redshift. In short, we’ll set up a basic EC2 instance for SFTP that will allow users to update the data they want to put into Redshift. From there, we’ll transfer the data from the EC2 instance to an S3 bucket, and finally, into our Redshift instance.
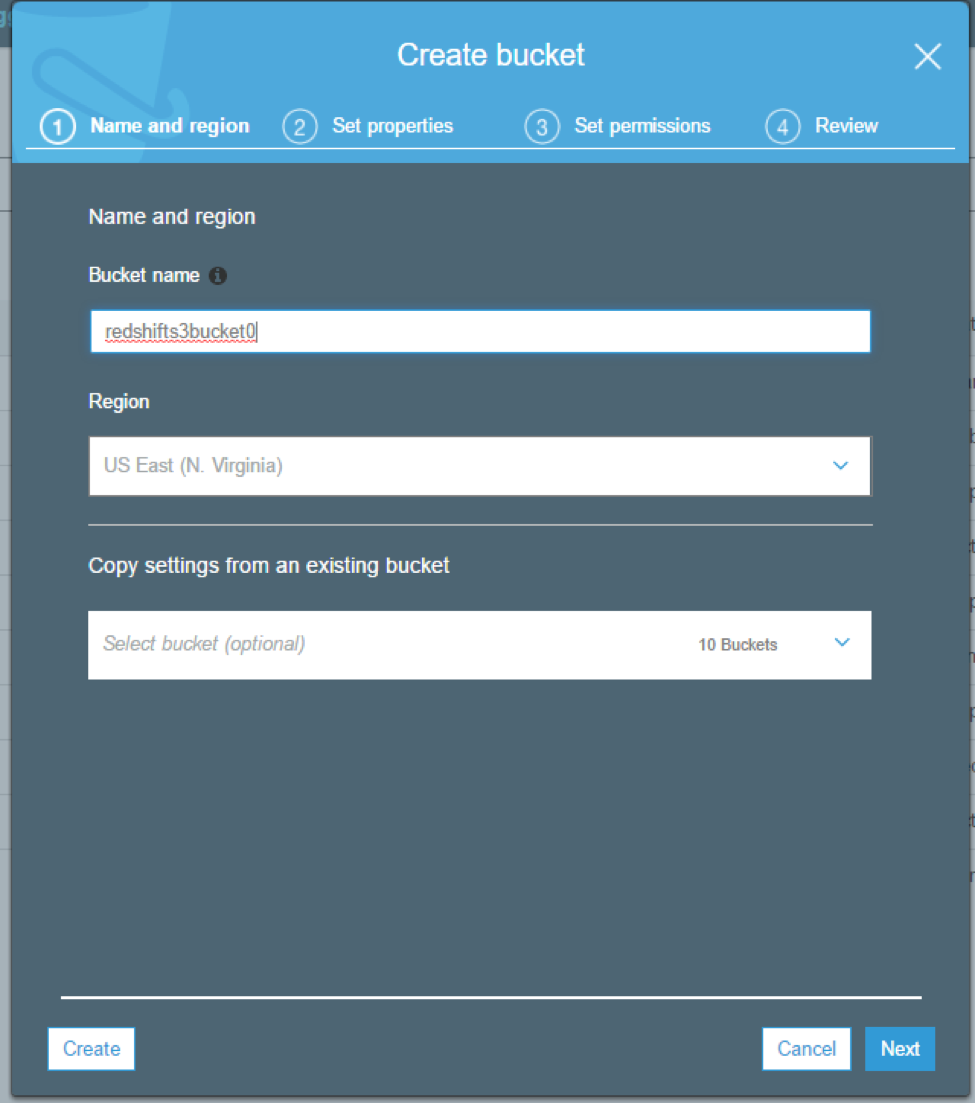
Create S3 Bucket
Let’s start by creating the S3 bucket. After logging into your AWS account, head to the S3 console and select ”Create Bucket.”
Create IAM Policy
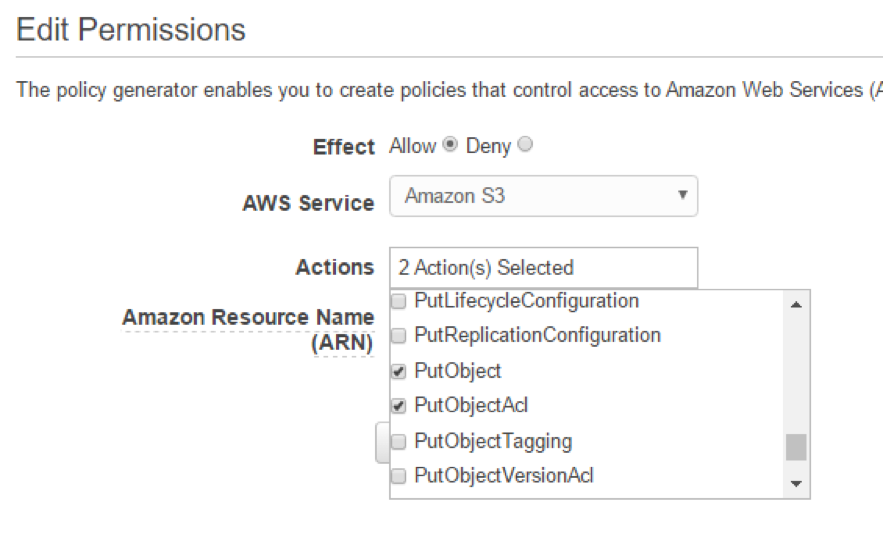
Next we are going to create an IAM policy that allows our EC2 instance to upload to the S3 bucket. We do this by going to the IAM section of the AWS console and clicking on the policies link.
Next, we create a custom policy and choose the following:
- AWS Service: Amazon S3
- Actions: PutObject, PutObjectAcl, ListAllMyBuckets
- Amazon Resource Name (ARN): arn:aws:s3:::redshifts3bucket01 (ARN will always be arn:aws:s3:::BUCKETNAME
Next we will name the policy and set a description. We’ll also be able to view the JSON version of the policy, which will look something like this:
{
“Version”: “2012-10-17”,
“Statement”: [
{
“Sid”: “Stmt1498839988000”,
“Effect”: “Allow”,
“Action”: [
“s3:ListAllMyBuckets”,
“s3:PutObject”,
“s3:PutObjectAcl”
],
“Resource”: [
“arn:aws:s3:::redshifts3bucket01”
]
}
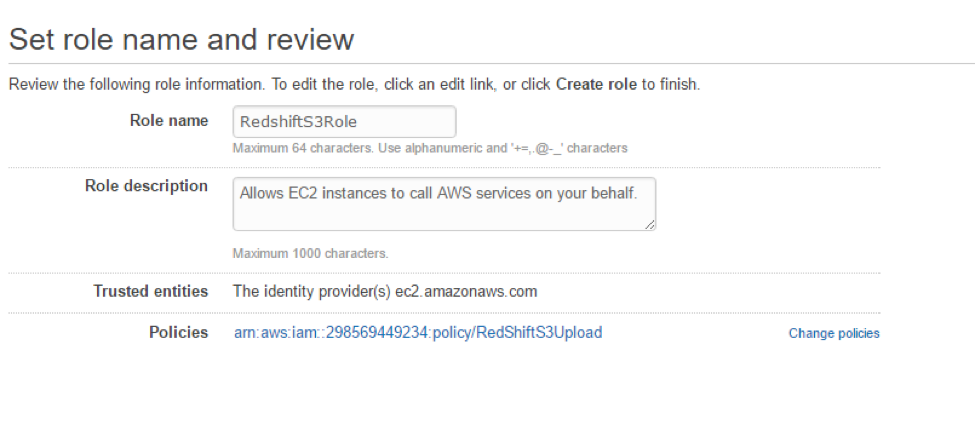
From here, we need to create a Role in our IAM console, click on and then click “Create New Role.” Select the Amazon EC2 option and then type in the first few letters of what you named your policy. Click the checkbox next to the name.
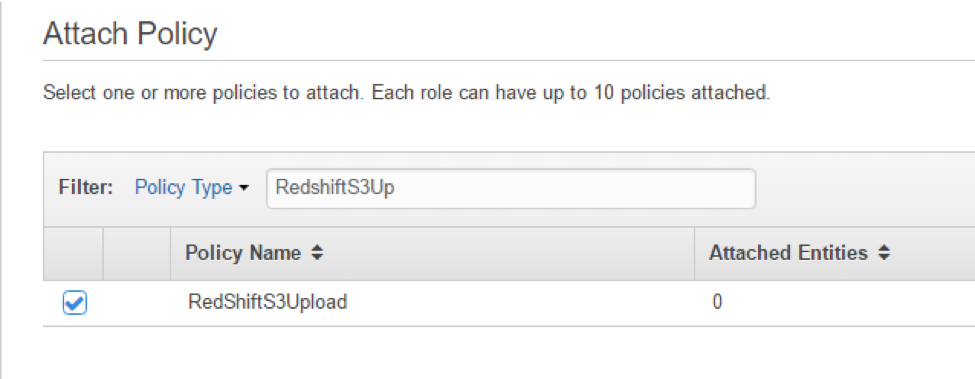
Click “Next,”name your role, and click “Create.”
Spin Up EC2 Instance
Now we are going to spin up our EC2 instance. Head to the EC2 section of the AWS console and choose to launch an instance. Select the Amazon Linux AMI and the t2.micro free tier.
On the “Configure Instance Details” page, specify your VPC and subnet and also select the option for assigning a public IP. Be sure to select the role you just created for the instance in the “IAM role” field.
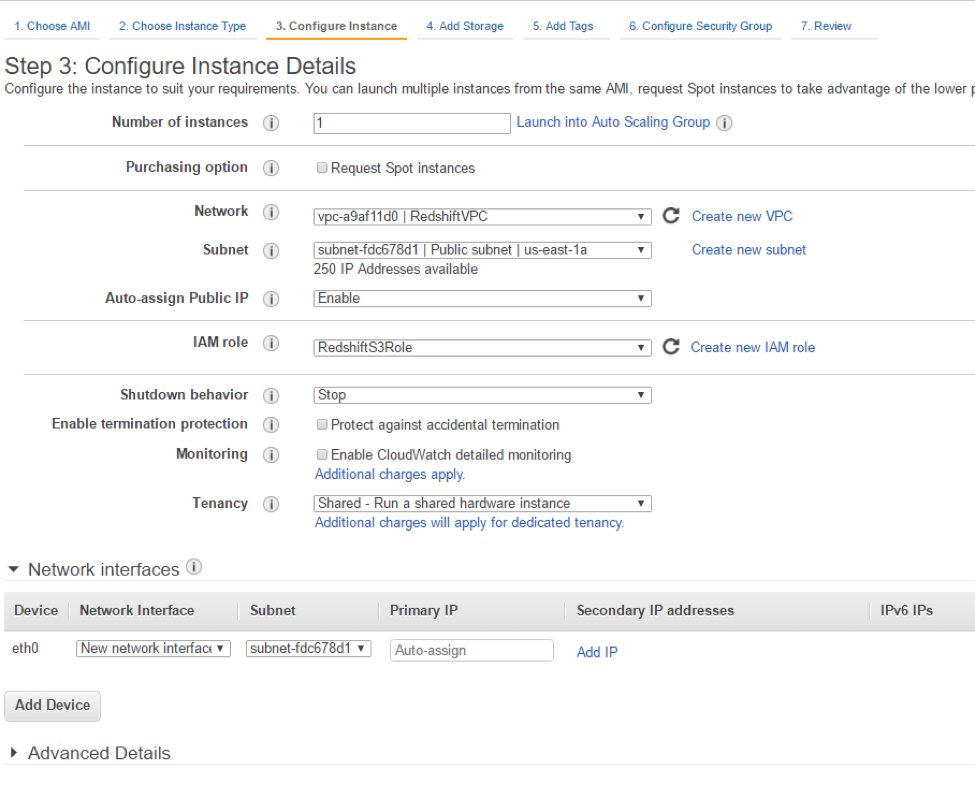
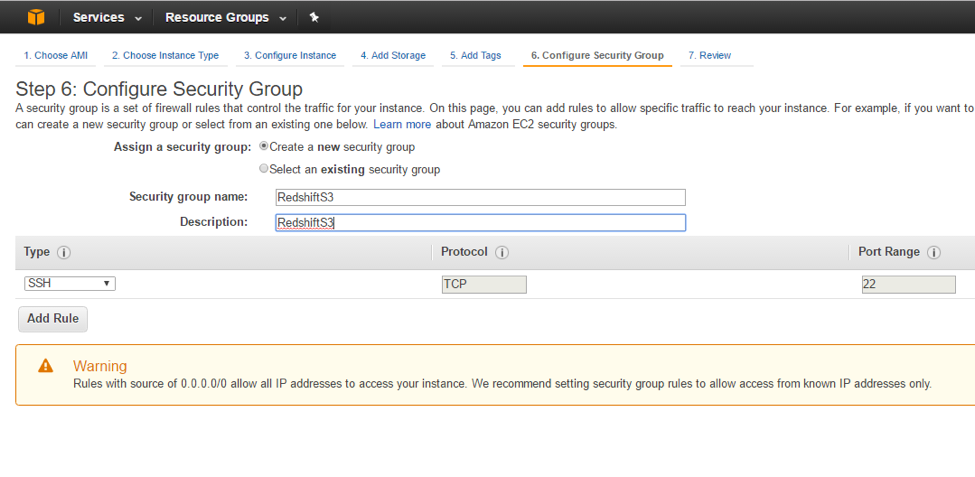
You can leave the default in place for the “Storage” and “Tags” pages or make any changes you would like. On the Configure security group page we will need to create a new group and allow the following:
- SSH, Port 22 – 0.0.0.0/0
- Custom, Ports 1024-1048 – 0.0.0.0/0
Click “Review” and then “Launch,” at which point you will need to either use an existing keypair or create a new one.
Create Redshift Cluster
While waiting for the instance to spin up we will create our Redshift cluster. Go to the Redshift page in the AWS console
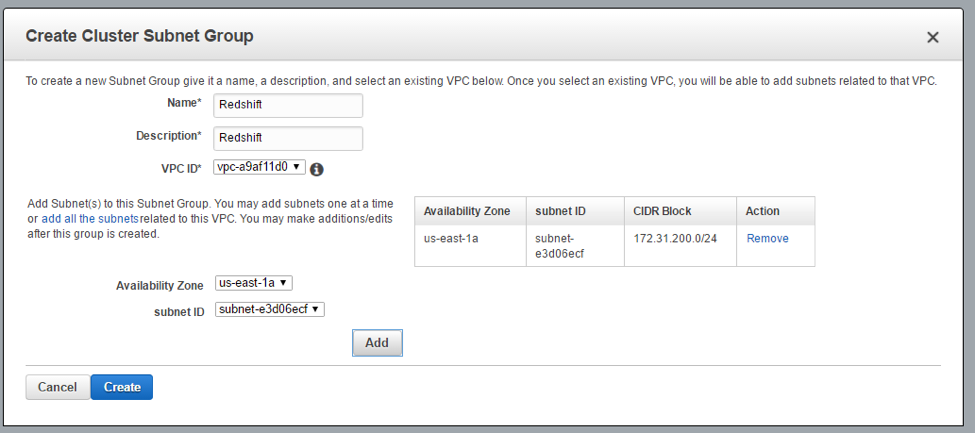
Firstly, if you are not using the default VPC and do not have a subnet group you will need to create one. You can do so by clicking “Security” on the Redshift console page and following the steps.
Now click “Launch Cluster” on the Redshift console page:
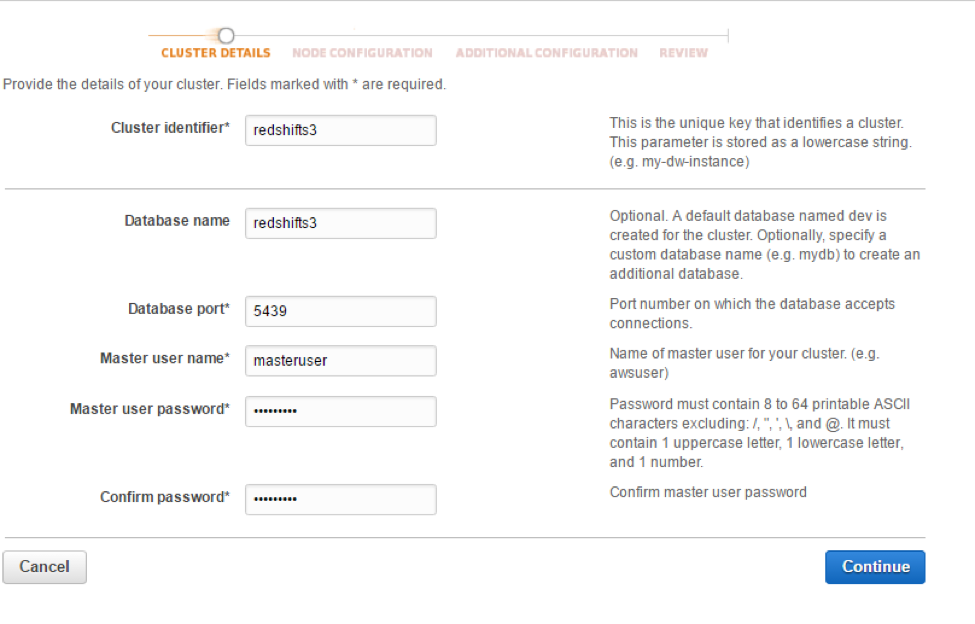
Provide the cluster details:
- Cluster Identifier: redshifts3
- Database name: redshifts3
- Port: 5439
- Master User name: masteruser
- Password: ##########
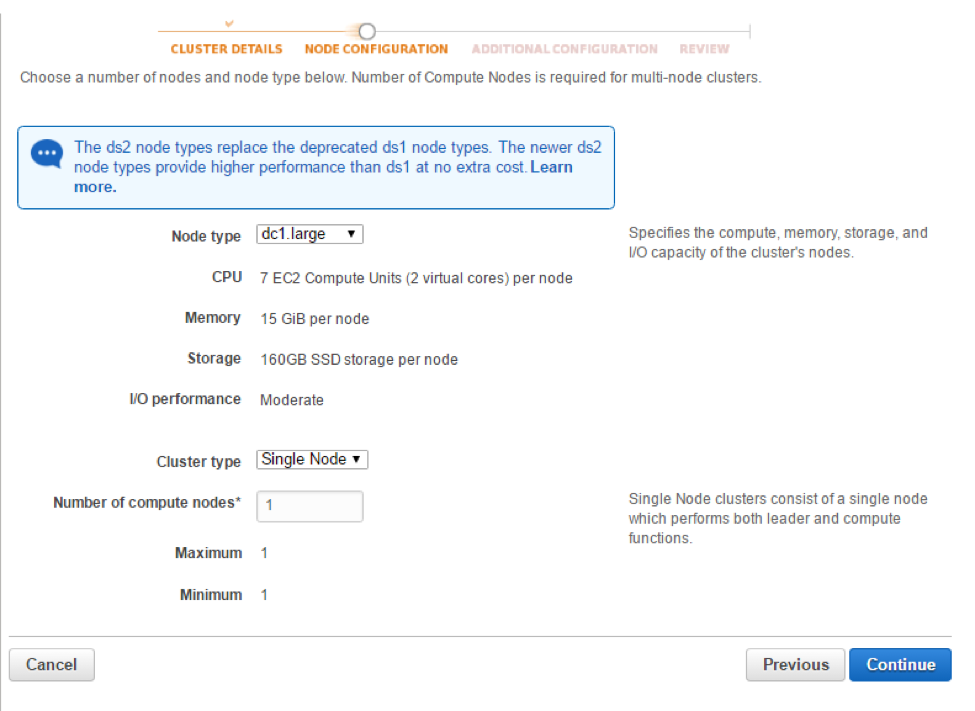
Next select the size of the node and other cluster parameters. In this case, let’s just leave the default.
Continue to the review page and then click “Launch Cluster.”
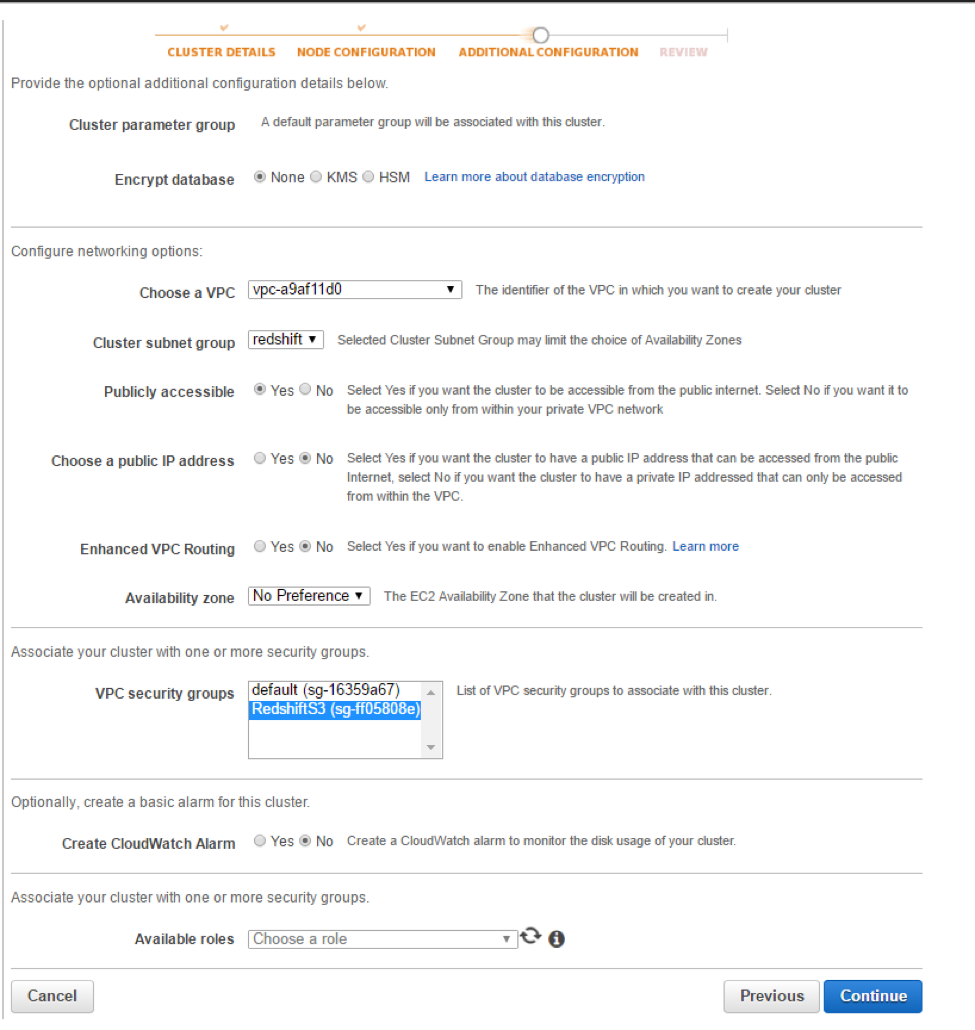
Next, choose the correct options for your VPC, Subnet group and Security group.
Now choose the correct options for your VPC, Subnet group and Security group.
Configure EC2 Instance
Next up, it’s time to let’slog in to and configure the EC2 instance we just created. Connect to the instance using SSH;once logged in, type the following commands:
sudo -i
yum update -y
yum install vsftpd
chkconfig –level 345 vsftpd on
vi /etc/vsftpd/vsftpd.conf
Change:
anonymous_enable=YES
to
anonymous_enable=NO
Uncomment:
chroot_local_user=YES
And add the following to the bottom of the file:
pasv_enable=YES
pasv_min_port=1024
pasv_max_port=1048
pasv_address=[YOURPUBLICIP]
Now save the file and restart vsftp.
/etc/init.d/vsftpd restart
Now create an FTP user and password:
adduser redshifts3
passwd Password@@@@
Now we are going to install s3cmd, which will let us easily sync folders to our S3 bucket. Enter the following commands:
wget http://ufpr.dl.sourceforge.net/project/s3tools/s3cmd/1.6.1/s3cmd-1.6.1.tar.gz
tar xzf s3cmd-1.6.1.tar.gz
cd s3cmd-1.6.1
sudo python setup.py install
/usr/local/bin/s3cmd –configure
Then enter the config information:
Enter new values or accept defaults in brackets with Enter.
Refer to user manual for detailed description of all options.

Access key and Secret key are your identifiers for Amazon S3

Access Key: xxxxxxxxxxxxxxxxxxxxxx

Secret Key: xxxxxxxxxxxxxxxxxxxxxxxxxxxxxxxxxxxx

Encryption password is used to protect your files from reading

by unauthorized persons while in transfer to S3

Encryption password: xxxxxxxxxx

Path to GPG program [/usr/bin/gpg]:

When using secure HTTPS protocol all communication with Amazon S3

servers is protected from 3rd party eavesdropping. This method is

slower than plain HTTP and can't be used if you're behind a proxy

Use HTTPS protocol [No]: Yes

New settings:

  Access Key: xxxxxxxxxxxxxxxxxxxxxx

  Secret Key: xxxxxxxxxxxxxxxxxxxxxxxxxxxxxxxxxxxx

  Encryption password: xxxxxxxxxx

  Path to GPG program: /usr/bin/gpg

  Use HTTPS protocol: True

  HTTP Proxy server name:

  HTTP Proxy server port: 0

Test access with supplied credentials? [Y/n] Y

Please wait, attempting to list all buckets...

Success. Your access key and secret key worked fine :-)

Now verifying that encryption works...

Success. Encryption and decryption worked fine :-)

Save settings? [y/N] y

Configuration saved to '/root/.s3cfg'
Last we just need to setup a bash script to copy the data into Redshfit:
copy customer
from ‘s3://mybucket/mydata’
iam_role ‘arn:aws:iam::0123456789012:role/MyRedshiftRole’;
There you have it. While this may seem like a lot, the whole process of moving your data from S3 to Redshift is fairly straightforward. Once you’re up and running, I have no doubt that you’ll find Amazon Redshift to be a reliable data warehouse that makes it simple and cost-effective to analyze all your data using standard SQL along with your existing Business Intelligence (BI) tools. Any questions about these steps? Get in touch.