
Container technology and its ability to run software when moving from one environment to another has helped it grow in popularity over virtual machines, due to its lighter weight and use of fewer resources. Kubernetes is one of these container technologies that, when paired with an optimal deployment model, has the capability to automate application orchestration, scaling and management across computing environments.
In this piece, we will explore the process of deploying Kubernetes on bare metal servers.
What is Kubernetes?
Kubernetes is a portable, extensible platform for managing containerized workloads and services. It is an increasingly popular tool for moving workloads efficiently across platforms with less overhead than traditional virtual machines (VMs).
Kubernetes’s capability to automate application orchestration, scaling and management makes it a very attractive lightweight platform for deploying workloads at large scale. It has been gaining momentum as a form of building cloud-like environments for web-scale type of applications, especially on bare metal servers.
Why Deploy Kubernetes on Bare Metal?
Kubernetes can be deployed as a service offered by cloud provider or on top of a VM layer or on dedicated bare metal servers—either on-premises or in a hosted environment. Each model has its advantages and drawbacks in terms of speed of availability, complexity, management overhead, cost and operational involvement.
Bare metal offers the operational flexibility and scalability inherent in a cloud model in addition to on-demand capacity management. Bare metal servers allow for optimized configuration with better performance, efficient resource usage and predictable improved cost.
Setting Up Kubernetes on a Bare Metal Server: A Step-By-Step Process
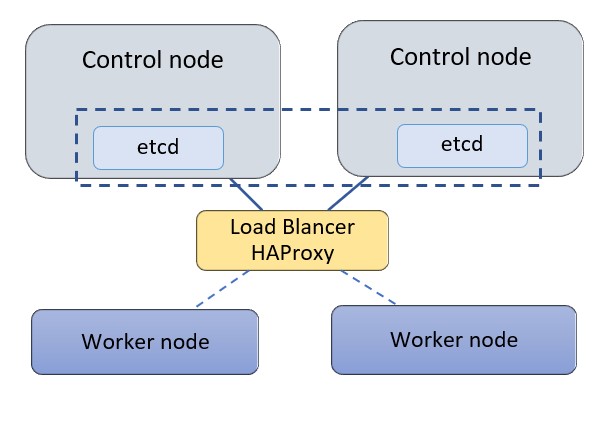
Designing a High Availability Kubernetes Cluster on Bare Metal
For this exercise, we’ll deploy Kubernetes on a cluster of two control nodes and two worker nodes with a standalone HAProxy load balancer (LB) in front of the control nodes. Each node is a bare metal server. Three control nodes are typically recommended for a Kubernetes cluster allowing control nodes to form quorum and agree on cluster state, but in this exercise, we’ll use two nodes to demonstrate the high availability setup. We will use the following configuration for this exercise:
- Kubernetes 1.18.6 is being used on bare-metal machines with Ubuntu 18.04.
- The control nodes are used for control and management of the cluster, and they run cluster-wide components such as apiserver, controller-manager, scheduler and etcd. Etcd is a distributed key-value store for the critical data of a distributed system. Within Kubernetes etcd is used as the backend for service discovery and stores the cluster’s state and configuration. Etcd can be deployed on its own standalone nodes but for this exercise we will keep etcd within the control nodes.
- A standalone node is used for HAProxy to load balance traffic to the control nodes and support control plan redundancy.
- The servers use a private network (or vlan) to communicate within the cluster. In our case the network is 172.31.113.0/26
Jump to Step
Step 1: Configuring HAProxy as a Load Balancer
Step 2: Install Docker and Related Packages on All Kubernetes Nodes
Step 3: Prepare Kubernetes on All Nodes
Step 4: Install the Key-Value Store “Etcd” on the First Control Node and Bring Up the Cluster
Step 5: Add a Second Control Node (master2) to the Cluster
Step 6: Add the Worker Nodes
Step 1: Configuring HAProxy as a Load Balancer
In this step wewill configure HAProxy as a load balancer on a standalone server. This node could be a bare metal server or a cloud instance. To keep the deployment steps generic and easy to follow we will define the IP addresses of the nodes as environment variables on all the server nodes.
#create a file with the
list of IP addresses in the cluster
cat > kubeiprc <<EOF
export KBLB_ADDR=172.31.113.50
export CTRL1_ADDR=172.31.113.38
export CTRL2_ADDR=172.31.113.40
export WORKER1_ADDR=172.31.113.45
export WORKER2_ADDR=172.31.113.46
EOF
#add the IP addresses of the nodes as environment variables
chmod +x kubeiprc
source kubeiprc
Install the haproxy package:
apt-get update && apt-get upgrade && apt-get install -y haproxy
Update the HAproxy config file “/etc/haproxyhaproxy.cfg” as follows:
##backup the current file
mv /etc/haproxy/haproxy.cfg{,.back}
## Edit the file
cat > /etc/haproxy/haproxy.cfg << EOF
global
user haproxy
group haproxy
defaults
mode http
log global
retries 2
timeout connect 3000ms
timeout server 5000ms
timeout client 5000ms
frontend kubernetes
bind $KBLB_ADDR:6443
option tcplog
mode tcp
default_backend kubernetes-master-nodes
backend kubernetes-master-nodes
mode tcp
balance roundrobin
option tcp-check
server k8s-master-0 $CTRL1_ADDR:6443 check fall 3 rise 2
server k8s-master-1 $CTRL2_ADDR:6443 check fall 3 rise 2
EOF
To allow for failover, the HAProxy load balancer needs the ability to bind to an IP address that is nonlocal, meaning an address not assigned to a device on the local system. For that add the following configuration line to the sysctl.conf file:
cat >> /etc/sysctl.conf <<EOF
net.ipv4.ip_nonlocal_bind = 1
EOF
Update the system parameters and start or restart HAProxy:
sysctl -p
systemctl start haproxy
systemctl restart haproxy
Check that the HAProxy is working:
nc -v $KBLB_ADDR 6443

Step 2: Install Docker and Related Packages on All Kubernetes Nodes
Docker is used with Kubernetes as a container runtime to access images and execute applications within
containers. We start by installing Docker on each node.
First, define the environment variables for the nodes IP addresses as described in step 1:
cat > kubeiprc <<EOF
export KBLB_ADDR=172.31.113.50
export CTRL1_ADDR=172.31.113.38
export CTRL2_ADDR=172.31.113.40
export WORKER1_ADDR=172.31.113.45
export WORKER2_ADDR=172.31.113.42
EOF
#add the IP addresses of the nodes as environment variables
chmod +x kubeiprc
source kubeiprc
Update the apt package index and install packages to allow apt to use a repository over HTTPS:
apt-get update
apt-get -y install \
apt-transport-https \
ca-certificates \
curl \
gnupg2 \
software-properties-common
Add Docker’s official GPG key:
curl –fsSL https://download.docker.com/linux/ubuntu/gpg | sudo apt-key add –

Add docker to APT repository:
add-apt-repository \
“deb [arch=amd64] https://download.docker.com/linux/ubuntu $(lsb_release -cs) stable”
Install Docker CE:
apt-get update && apt-get install docker-ce
Next confirm Docker is running:


Step 3: Prepare Kubernetes on All Nodes, Both Control and Worker Ones
Install the Kubernetes components on the node. This step applies to both control and worker nodes.
Install kubelet, kubeadm, kubectl packages from the Kubernetes repository. Kubelet is the component that runs on all the machines in the cluster and is needed to start pods and containers. Kubeadm is the program that bootstraps the cluster. Kubectl is the command line utility to issue commands to the cluster.
Add the Google repository key to ensure software authenticity:
curl -s https://packages.cloud.google.com/apt/doc/apt-key.gpg | apt-key add –

Add the Google repository to the default set:
cat <<EOF >/etc/apt/sources.list.d/kubernetes.list
deb https://apt.kubernetes.io/ kubernetes-xenial main
EOF
Update and install the main packages:
apt-get update && apt-get install -y kubelet kubeadm kubectl
To ensure the version of these packages matches the Kubernetes control plan to be installed and avoid unexpected behavior, we need to hold back packages and prevent them from being automatically updated:
apt-mark hold kubelet kubeadm kubectl
After the package install, disable swap, as Kubernetes is not designed to use SWAP memory:
swapoff -a
sed –i ‘/ swap / s/^/#/’ /etc/fstab
Verify kubeadm utility is installed:
kubeadm version

Change the settings such that both docker and kubelet use systemd as the “cgroup” driver. Create the file /etc/docker/daemon.json as follows:

Repeat Steps 2 and 3 above for all Kubernetes nodes, both control and worker nodes.
Step 4: Install the Key-Value Store “Etcd” on the First Control Node and Bring Up the Cluster
It is now time to bring up the cluster, starting with the first control node at this step. On the first Control node, create a configuration file called kubeadm-config.yaml:
cd /root
cat > kubeadm-config.yaml << EOF
apiVersion: kubeadm.k8s.io/v1beta1
kind: ClusterConfiguration
kubernetesVersion: stable
apiServer:
certSANs:
– “$KBLB_ADDR”
controlPlaneEndpoint: “$KBLB_ADDR:6443”
etcd:
local:
endpoints:
– https://$CTRL1_ADDR:2379
– https://$CTRL2_ADDR:2379
caFile: /etc/kubernetes/pki/etcd/ca.crt
certFile: /etc/kubernetes/pki/apiserver-etcd-client.crt
keyFile: /etc/kubernetes/pki/apiserver-etcd-client.key
EOF
Initialize the Kubernetes control plane:
sudo kubeadm init –config=kubeadm-config.yaml –upload-certs
If all configuration goes well, a message similar to the one below is displayed.
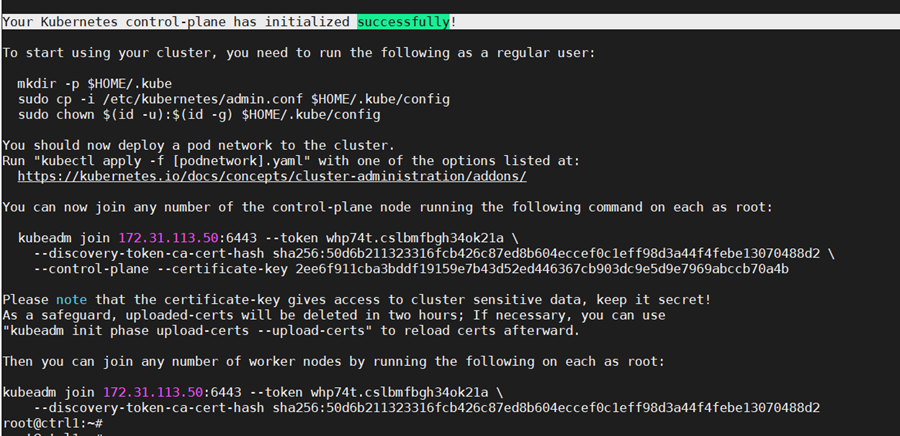
Kubeadm commands are displayed for adding a control-plane node or worker nodes to the cluster. Save the last part of the output in a file as it would be needed later for adding nodes.
Please note that the certificate-key gives access to cluster sensitive data. As a safeguard, uploaded-certs will be deleted in two hours.
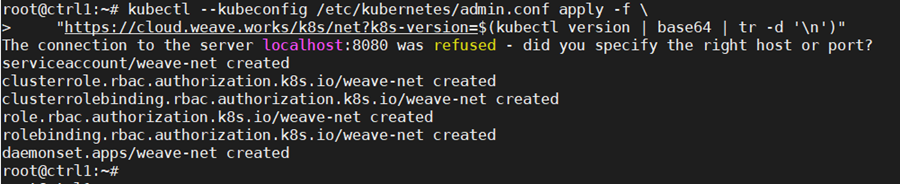
On the configured control node, apply the Weave CNI (Container Network Interface) network plugin. This plugin creates a virtual network that connects docker containers deployed across multiple hosts as if the containers are linked to a big switch. This allows containerized applications to easily communicate with each other.
kubectl –kubeconfig /etc/kubernetes/admin.conf apply -f \
“https://cloud.weave.works/k8s/net?k8s-version=$(kubectl version | base64 | tr -d ‘\n’)”
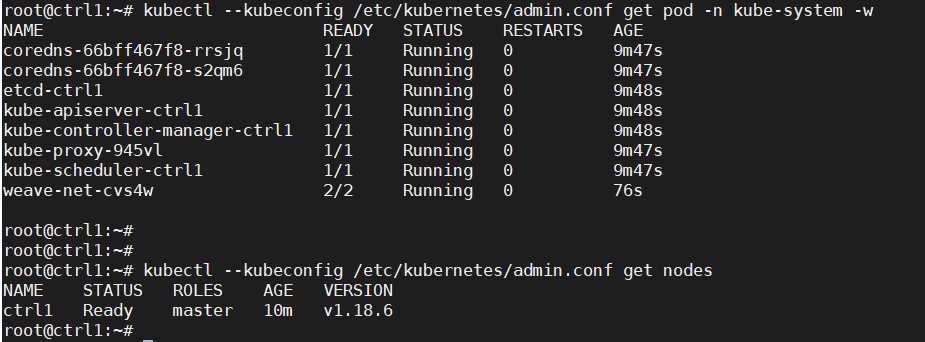
Check that the pods of system components are running:
kubectl –kubeconfig /etc/kubernetes/admin.conf get pod -n kube-system -w
kubectl –kubeconfig /etc/kubernetes/admin.conf get nodes
Step 5: Add a Second Control Node (master2) to the Cluster
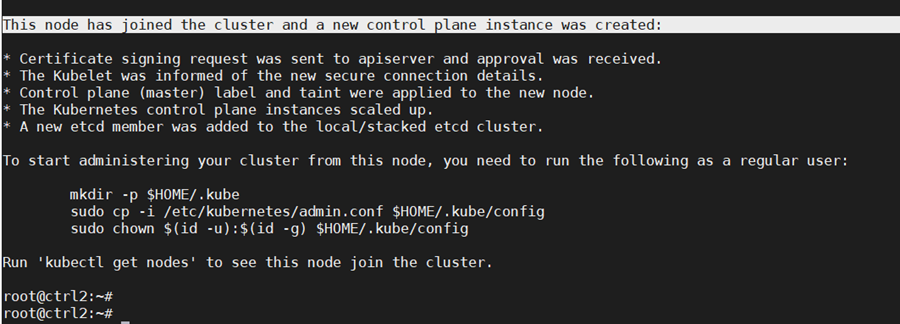
As the fist control node is running, we can now add a second control node using the “kubeadm join” command. To join the master2 node to the cluster, use the join command shown in the output at the initialization of the cluster control plane on control node 1.
Add the new control node to the cluster. Make sure to copy the join command from your actual output in the first control node initialization instead of the output example below:
kubeadm join 172.31.113.50:6443 –token whp74t.cslbmfbgh34ok21a \
–discovery-token-ca-cert-hash
sha256:50d6b211323316fcb426c87ed8b604eccef0c1eff98d3a44f4febe13070488d2 \
–control-plane –certificate-key
2ee6f911cba3bddf19159e7b43d52ed446367cb903dc9e5d9e7969abccb70a4b
The output confirm that the new node has joined the cluster.
The “certificate-key” flag of the “kubeadm join“ command causes the control plane certificates to be downloaded from the cluster “kubeadm-certs” store to generate the key files locally. The security certificate expires and is deleted every two hours by default. In case of error, the certificate can be reloaded from the initial control node in the cluster with the command:
sudo kubeadm init phase upload-certs –upload-certs

Once the certificates are reloaded, they get updated and the “kubeadm join” needs to be modified to use the right “certificate-key” parameter.
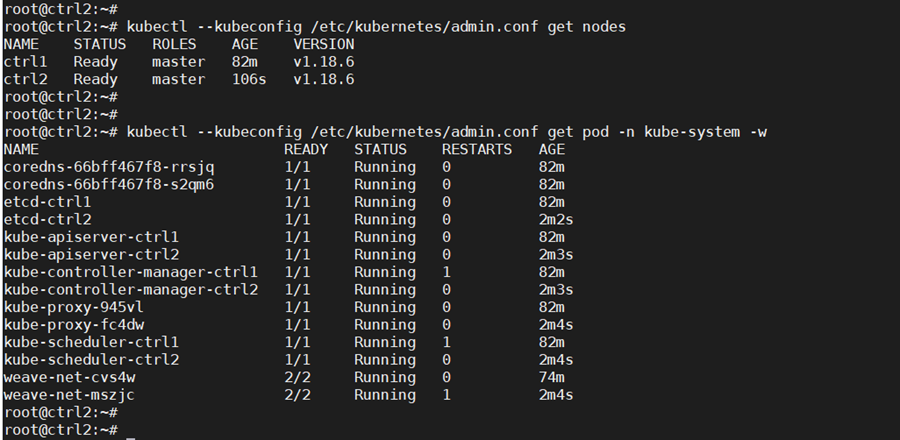
Check that nodes and pods on all control nodes are okay:
kubectl —kubeconfig /etc/kubernetes/admin.conf get nodes
kubectl –kubeconfig /etc/kubernetes/admin.conf get pod -n kube-system -w
Step 6: Add the Worker Nodes
Now worker nodes can be added to the Kubernetes cluster.
To add worker nodes, run the “kubeadm join” command in the worker node as shown in the output at the initialization of the cluster control plane on the first control node (example below, use the appropriate command saved from the controller build):
kubeadm join 172.31.113.50:6443 –token whp74t.cslbmfbgh34ok21a \
–discovery-token-ca-cert-hash
sha256:50d6b211323316fcb426c87ed8b604eccef0c1eff98d3a44f4febe13070488d2
The output confirms the worker node is added.

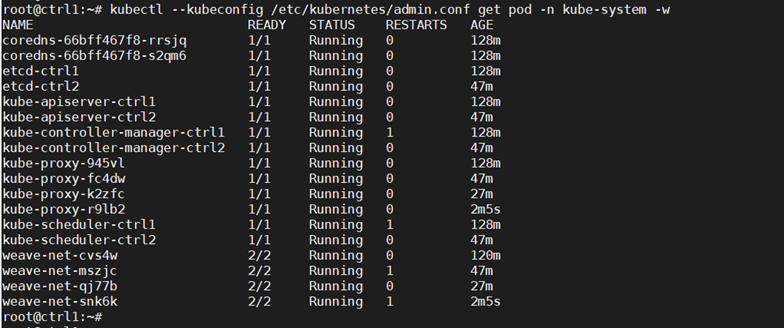
Check the nodes that are in the cluster to confirm the addition:
kubectl –kubeconfig /etc/kubernetes/admin.conf get nodes

With this config we have deployed an HA Kubernetes cluster with two control nodes, two worker nodes and an HAProxy load balancer in front of the two control nodes.
The cluster deployed can be extended in a similar way as described above with more control nodes or additional worker nodes. Another HAProxy load balancer can be added for high availability.
Conclusion
The Kubernetes deployment demonstrated above used a cluster of bare metal servers. Using INAP Bare Metal, the same deployment can span multiple sites using additional networking plugins to achieve a highly available and scalable distributed environment. INAP Performance IP® can further optimize the inter-site connectivity by providing low latency for better overall performance of Kubernetes clusters.