
How to Accurately Size Your Backup Storage (And Save Money)
My parents made sure the phrase “planning is the key to success” became the mantra of my childhood. And for good reason too. Whether it was a hiking weekend, fishing trip or exotic vacation, planning was essential to the pleasant memories I took from these adventures simply because a lack thereof very well could’ve led to disastrous results.
As it turns out, it’s now a mantra I apply every day toward sizing cloud environments.
When working with clients, a topic we frequently discuss is the current state of their environment and its anticipated growth over a period of time. More often than not, this is a “guesstimate” science due to the complexity of most setups and the lack of statistical data for greenfield deployments.
These facts lead some IT professionals to manage their environments via the “learn and adjust on the fly” approach. While that may work in some scenarios, it’s hardly a reliable method for managing critical business assets. Having a ballpark idea of future state requirements goes a long way.
The same principle applies to backup and disaster recovery strategy. For just a small time investment, proper planning can save you thousands of dollars.
To show you how, let’s walk through a hypothetical, but far from uncommon, example of sizing requirements. Note that this is the same process our solutions engineers use for sizing HorizonIQ Cloud Backup powered by Veeam Cloud Connect, but it’s still applicable for all types of backup jobs.
Covered in six steps below, the goal of this exercise is to help you understand two things: 1) the process for making sure your backup jobs will work given specific retention requirements, recovery targets and backup windows; and 2) the method for getting just enough space for your current needs while simultaneously creating a roadmap with expansion milestones.
(If you want to skip all the details and access a very helpful sizing calculator, jump down to step four!)
Step One — Assess the Job Setup and Key Requirements
Let’s assume we have five critical workloads that need to be backed up. They each require high availability and a long-term retention policy:
- VM1 – Active Directory
- VM2 – SQL server
- VM3 – App server
- VM4-5 – Web frontend
First off, we need to make note of our RPO/RTO and data retention policy. We can’t arrive at an accurate sizing estimate without them.
In this case, all VMs require the same RPO/RTO, as they belong to the same application group:
- RPO – 6 hours
- RTO – 24 hours
The retention policy is as follows:
- Last 7 days of backups
- Monthly backup job copies
Next, we need to gather some key info regarding the VMs, data and backup windows.
–Operating System — All Guest OS’s are Microsoft Windows 2012 R2
–Change Rate — All data on the VMs, except Active Directory Domain controller, have a change rate of 5%
–Source Data Size — The total size of our VMs is 800GB:
- VM1 – 100GB
- VM2 – 250GB
- VM3-5 – 150GB
–Backup Windows — The idle/non-busy time periods deemed suitable for backups are established as such: Central Time Zone: 7-9 a.m., 1-2 p.m., 5-6 p.m., and 1-2 a.m.
–Read/Write — The storage can handle up to 300MB/s reads and 300MB/s writes at a given time
–Uplinks — The environment is configured to use 2 x 1Gbps uplinks to Backup server, no LACP — 1Gbps maximum at a time
Step Two — Make Sure Backup Windows Align with RPO/RTO
Now we have to review the above information to ensure there aren’t any potential conflicts with our requirements.
In this scenario, the backup windows conflict with the 6-hour RPO. The time between 5 p.m. to 1 a.m. is spaced by eight hours, which causes the violation. On the other hand, 1-5 p.m. is spaced by four hours and is not considered a violation, since the RPO is met (the oldest restore point is no older than 6 hours).
To mitigate the risk of a RPO policy violation, we decide to re-arrange the non-busy periods and adjust application-level tasks to allow for a backup schedule within the following windows: 7-9 a.m., 1-2 p.m., 7-9 p.m., and 1-2 a.m. This may require a meeting or two to sort out, but that’s why we’re planning ahead!
To ensure the 24-hour RTO is achievable, simply:
- 1. Take the total size of the initial, Day 1 data set: 800GB1
- 2. Determine how long the backup will take based on the storage read/write speed: 300MB/s read and 300MB/s write
- –Because our storage also handles production VMs, let’s estimate that only 50% of the top capabilities will be available for backup/restore purposes (150MB/s).
- 3. Initial Backup time: 800GB / 150MBps = 1.5 hours
Plenty of time to spare!
Step Three — Make Sure the Network Can Handle the Backup Jobs
We also want to make sure our network equipment can tolerate the extra load.
Out of two available 1Gbps uplinks, only half the overall capacity (1Gbps) can be allotted for backup purposes. Meaning, the initial backup will take an estimated two hours. We’ll use this value for all further calculations on timing over 1.5 hours at the storage level.
One last thing before getting to the sizing: Before we can calculate the total storage requirements, we have to make sure our 1-hour windows, occurring four times daily, are sufficient for copying incremental backups, based on the rate of change.
–Every incremental backup is expected to contain up to 5% changed data, which means we need to copy 40GB every six hours. Based on our 150MBps benchmark, this will take approximately 15-20 min.
All good!
Step Four — Calculate Total Backup Storage Requirements
How much space do we need to store the backup data? As with everything in IT, that depends on the type of data and the configuration chosen for the backups.
In our scenario, two types of jobs will run: the Backup Job (our last seven days of backups) and the Backup Job Copy (our monthly backup copies).
To make our calculations, we’ll use this handy calculator developed by one of Veeam’s talented team members:
Calculating Storage for the Backup Job
The default backup job type in Veeam v9 is Forever Forward Incremental, in which no Synthetic Full backups are created. This type of job allows for huge space savings, allowing us to avoid the need for longer backup windows and restore times.
Using the info from our assessment, fill out the calculator fields as follows:

This input will deliver the following retention interval schedule, with a total storage size of 1,360GB. This includes of 420GB workspace.

The dates and times on the right represent the 6-hour intervals over the 7-day retention span. While knowing those dates and times aren’t as critical for short-term backup retention policy, the impact it has over the long term is huge, as we’ll see in our provisioning plan.
Calculating Storage for the Backup Copy Job
For the monthly Backup Copy Jobs, use these inputs.
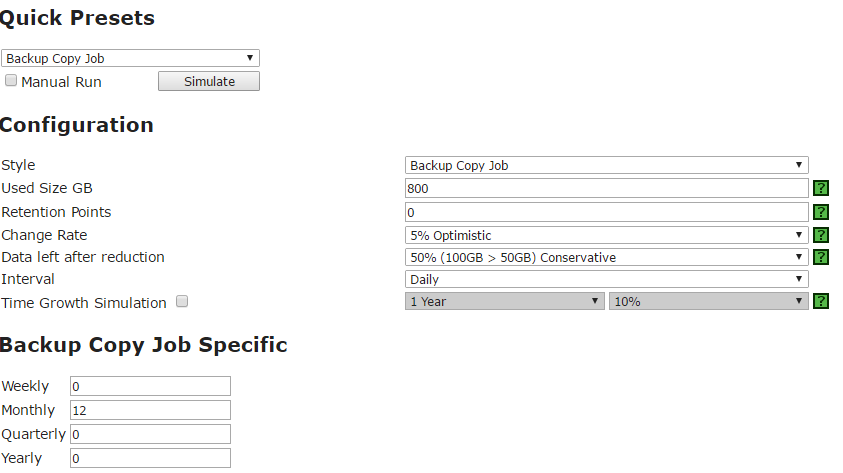
That will produce the following:

We now know the total space needed to store all of the data given the requirements: 5,620GB + 1,360GB = ~7TB.
Step Five — Map Your Provisioning Plan
Since the total space can be estimated before we even begin the initial job, why not provision the 7TB and call it a day? Simple: Because that would cost us some serious money.
We know that on Day 1 our Backup Copy Job will not require all the estimated space. Therefore, we can provision a smaller amount of storage, sufficient for the needs of the first four months and then add the space gradually.
For example, if we choose not to provision based on the milestones accounted for above we’d have to request all 7TB of space starting Day 1, costing us about $7,200/year.
Compare that to provisioning the space gradually:
Day 1 – provision space required for the first 3 months – 4 x 400GB = 1600 GB, $160/mo, $480/period
Day 90 – provision space required for 6 months – 7 x 400GB = 2800 GB, $280/mo, $840/period
Day 180 – provision space required for 9 months – 10 * 400GB = 4TB, $400/mo, $1200/period
Day 240 – provision all space – $1800/period
The grand total for the year in this case is $4,320 – nearly $3,000 less than “no planning ahead” plan.
Step Six — Plan How to Spend Your Savings!
Storage planning is not new conceptually, but you’d be surprised how often it’s skipped during development and deployment stages. Don’t make that mistake.
Planning not only allows you to validate your decisions at an early stage of the project and also gives company management confidence that your management is efficient and sound. The cherry on top – all extra savings that can be applied once you have a definitive set of milestones and know exactly when to provision and how much to add/remove. In our example, it may have saved us $3000/year, but for many organizations, savings can balloon to 10X that size.
So there we have it. Happy planning!